Jupyter Notebooks
This is the second session following Code Club’s relaunch. The focus is introducing jupyter notebooks and explaining to users how to get started with a new project and briefly introducing some key concepts.
We are also planning some time for Q&A following the first session.
Session Slides
Use the left ⬅️ and right ➡️ arrow keys to navigate through the slides below. To view in a separate tab/window, follow this link.
The Tools You Will Need
Though Jupyter notebooks can be used with a variety of coding languages and in different settings the key tools used in this session are:
- Language: Python
- Dependency Management & Virtual Environments: uv
- Version Control: Git, GitHub Desktop
- IDE: VS Code/Jupyter Notebooks (or your preferred IDE)
You can install all the tools you’ll need by running the following one-liner run in PowerShell:
winget install astral-sh.uv Microsoft.VisualStudioCode github-desktop
You can find more information on these topics in the Python Onboarding session
Project Setup
Our project set-up will follow the same steps as used in the onboarding session, by using uv to set up a new project folder.
To get started we will use PowerShell powershell to open a command prompt, it should open in your C drive (e.g., C:\Users\user.name). If it does not, run cd ~, and it should return to your home directory. We recommend the use of a single folder to hold your python projects while learning, because we will be using git version control we will call this “Git”. we can use the command mkdir code_club to make this folder and then use cd code_club to relocate to this folder1.
We will create a new uv project in this directory using the command uv init. The new project will contain everything we need, including a Python installation, a virtual environment, and the necessary project files for tracking and managing any packages installed in the virtual environment. To set up a new project called test-project, use the following command:
uv init test_project
Having created this new directory, navigate to it using cd test_project.
For this session you will need to add 3 Python packages, ipykernel2, pandas and seaborn We can use the following command:
uv add ipykernel pandas seaborn
We are going to create a blank notebook in this file by running the command new-item first_notebook.ipynb if you now run ls you will note this file has been created
Your Python project is now set up, and you are ready to start writing some code. You can open VS Code from your PowerShell window by running code ..
Opening your project in VS Code
You could also do this from within VS Code as most IDEs include a terminal interface which will be demonstrated in session.
For now launch VS Code and click File > Open Folder.... You’ll want to make sure you select the root level of your project. Once you’ve opened the folder, the file navigation pane in VS Code should display the files that uv has created, as well as the notebook you created: first_notebook.ipynb. Click on this to open it.
Once VS Code realises you’ve opened a folder with Python code and a virtual environment, it should do the following:
- Suggest you install the Python extension (and, once you’ve created a Jupyter notebook, the Jupyter one) offered by Microsoft - go ahead and do this. If this doesn’t happen, you can install extensions manually from the Extensions pane on the left-hand side.
- Select the
uv-created.venvas the python Environment we’re going to use to actually run our code. If this doesn’t happen, pressctrl-shift-P, type “python environment” to find thePython - Create Environment...option, hit enter, choose “Venv” and proceed to “Use Existing”.
If VS Code has found the virtual environment, it may pick up the correct kernel. If not you may need to select this manually this can be done by clicking in the top right where you can see Select Kernel (see below)
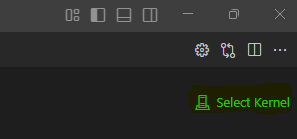
We can then select the appropriate kernel from python environments and looking for

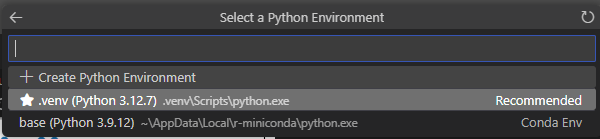
Once the kernel is enabled you are ready to start adding cells to your notebook. these can either be code cells which is where you include your program elements or markdown which enable the addition of headings, analysis and commentary.
Footnotes
We recommend using the C drive for all Python projects, especially if using version control. Storing projects like these on One Drive will create many unnecessary issues. It can be helpful to use a sub-directory to store projects but is not necessary and is not a requirement for code club↩︎
Strictly speaking, we should install ipykernel as a development dependency (a dependency that is needed for any development but not when the project is put into production). In this case, we would add it by running
uv add --dev ipykernel.However, in this case, it is simpler to just add it as a regular dependency, and it doesn’t harm.↩︎